The kirtle is sort of a general purpose under-dress. The pattern
being drafted below is actually somewhat earlier than the elizabethan period
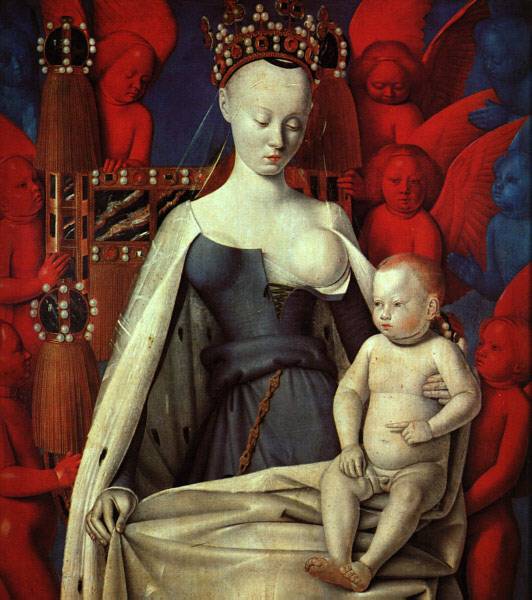
— I’m basing the seam placement on Fouquet’s The
Virgin of Melun. I haven’t found any truly elizabethan sources for a gored
kirtle with a *front* side seam. Actually, after going through Patterns of Fashion,
Queen Elizabeth’s Wardrobe Unlock’d, and Alcega’s pattern book, the only front
side seams I found on *anything* were for a horse trapping. They don’t so much
seem to have happened during the period. But, it’s a terribly flattering style,
lots of ‘bethan enthusiasts also do earlier periods, and in a pinch you can
make up the pattern by altering a standard princess line commercial dress pattern. (That’s not what we’re going to do here. We’re going to make a pattern from scratch. Why? Er…. I guess I just like pain. *shrug*)

Here’s a simple sketch, showing seam placement. I like to start with a clear
sketch. The hardest part about pattern drafting is getting the seams in
the right place, so having a good sketch is like having a road map.

I do most of my draping in muslin. (Yes, I go through a *lot* of muslin.)
The first step in draping any pattern is making pieces of muslin about
the right length (you don’t want them to be too short for the piece you’re
draping.) In this case, I need shoulder to floor length pieces. The width
of the pieces is also important. I have 45″ wide muslin, so I rippd
each piece in half, so that I know my finished pattern will fit on folded
45″ wide fabric. Ain’t that clever?

I like to start with the front of a pattern. I’ve pinned a piece of muslin
along the center front line of janey (marked with a black ribbon). One
of the tricks to pattern drafting is knowing exactly where to put shaping
seams. I find that, if you smooth the fabric away from the general area
of the seam line and the piece you’re working on, the ends of the wrinkles
you get point to where the seam goes. In this case, my diagonal wrinkles
correspond with exactly where the curved bust/center front seam goes.

Using those wrinkles as guides, I’ve maked the edge of the piece with pins.
*Lots* of pins. I’ve also marked the scooped neckline with pins. While
pinning, I’ve been smoothing the fabric to get a wrinkle free piece. This
is the center front of the pattern.

Using
the pins as a guide, I cut the piece — basically, this is just playing
connect the dots. ;)

This kirtle has a gored skirt, which can be a little tricky to cut because
all of the skirting is trapazoidal, rather than rectangular. What I’m
doing here is arranging the muslin so that it has about the fullness I
want in the finished piece, then pinning it to the corded petticoat. Once
this is done, I can cut the skirt, using my pins as a guideline.

The finished center front piece. I’ve unpinned it from the petticoat so that
you can see the shape of the skirting. I’ve chosen to keep the center
fron of the skirting straight, rather than angling. I don’t really like
a lot of fullness at the front of a skirt.

The side front piece starts about the same way the center front did — I’m
pinning muslin to the dummy to cover the area that the piece covers in
the finished pattern, then smoothing it over to the side seam marker on
my dummy.
![]()
To make sure that my front seam matches perfectly along the curve, I’m actually pinning this piece by pulling it over the center front piece (still pinned
to the dummy), and placing pins between the pins on the center front piece
while I smooth out the muslin.

Before I can cut the piece, I have to transfer the pins over about a half inch
to the inside of the side front piece.

The side front, completed. Again, I’ve used the pins as a cutting guide up
top, and pinned the skirting to the petticoat to guage the fullness before
cutting.

The next piece I’m working on is the center back. I tend to work front, then
back, always working from the center towards the side. It’s just easier
for me. (Then again, I also find it easier to only draw half a design
sketch, and assume both sides look the same. I’m a bit of a freak. ;)
) I’ve got extra muslin sticking past the center back line — about 6″.
This is because I want a gore at the center back of the skirt, so I need
to have material to make it out of.

The center back piece, with pins marking the neckline and the side back seam. You might notice that there’s some wrinkling across the back — about
at the top of the corset. My dress dummy’s back curves more than mine
does, because she’s foam and goes poof at the top of her corset in back
(but not in front, perversely). I just work around that. Mostly, it means
that to fit me correctly, anything across the back of her shoulders has
to be really tight. You’ll find that all dummies have their little quirks,
and you just learn to deal — they’re kind of like cars that way. :)

The center back piece, cut. Again, I followed the pins and pinned fullness
to the petticoat to get it right.

Preparing for the side back piece. I’m sure this comes as a shock at this point, but I’m smoothing the muslin and pinning it by the other seams. (Yes,
pattern draping gets a bit repetative.) This is the easiest bit, because
I’m basically filling in the only remaining blank spot on the dummy with
fabric — no thinking required.

The finished pattern, from the back.

And
again, in 3/4 view. No great shakes, and no major surprises. :)