
Scissors don’t come with directions. Much like a screwdriver (the mechanical kind), they are supposedly a tool so simple that you should just look at them and know. And, honestly, looking at a scissors will give you the basics, but is there more to learn? Take a look, and ask yourself this:

If it’s like the top, congrats! This post is not for you. Move along. These are not the words you’re looking for. But if your straight cuts are more of a series of weird snippy bits and bites, we have some things to discuss.
First off, why does it matter? Am I just (and it has been suggested) horribly OCD and persnickety and Require That All The Things Be Done My Way(tm) so that I can make others crazy and lower their grades? Maybe. But hear me out, because while all those things might be true, I’m not crazy.
You can only sew as accurately as you cut. If your cutting is all over the place, then your seam allowances aren’t accurate. If your seam allowances aren’t accurate, how do you know where your stitching line is? So, there’s really two options: you’re going to have mark out all your stitching lines, and then match them up while sewing. I’ve tried it. It’s not relaxing.
Also, if you straight cuts are all insy-outsy and you do somehow painstakingly match the edges and pin the bejeezies out of it and assume you can just sew along at the normal seam allowance, you’re gonna have issues. Namely, your seam is going to look all weird and bubbly, and no amount of ironing is going to make it better. You’ll probably just get a lot of weird little wrinkles and assume irons aren’t your thing. Because geometry. It will never work. I speak from personal experience, and years of watching students struggle.
So here are the two biggest common fails with cutting.


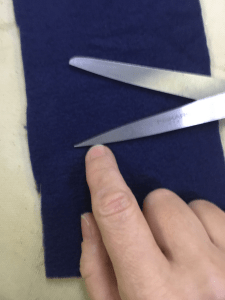
How does this happen? If you look closely at the first picture, you will notice that my scissors are above the work surface. I’m also pushing forward with the scissors – you can see that in the way the edge is pulling forward. The fabric has to go somewhere. If you’re not aware, fabric’s favorite place to go is Wrinklelandia. Those wrinkles aren’t perfectly lined up like straight pleats, so when you cut through them… It ends in tears and lamentation, kinda like a Conan the Barbarian plot device but less sweaty and muscle-y.
Lest you think this is only a problem with light, unstable fuss-bucket fabrics like silk gazar or every kind of chiffon ever, nope! I’m cutting polar fleece in these pictures. Polar. Fleece. The fabric literally designed for non-sewers. You can also do the same thing with a rotary cutter by trying to go too fast.
How do you avoid this? Here’s a couple rules:
- Thou shalt sharpen thine scissors. Basically, anything with a cutting edge prefers to be sharp. Dull scissors don’t cut as effectively, which slows them down, which makes it more likely that you’ll try to go to fast. Just get the little scissors sharpening thing. (But remember that it’s not a magic charm. You have to use it regularly, not just pop it into a drawer.)
- Thou shalt not get ahead of thyself. Don’t push forward against the fabric.
- Thou shalt not lift thine scissors. Scissors should remain in contact with the work surface at all times and if you have ever seen me cut midair, uh… Ok, this is awkward, but do what I say, not what I do.
- Thou shalt weight thy cutting. Pinning pattern pieces to the fabric is not enough. Use weights. They are faster, they never draw blood (unless you are REAL talented), and they really help with this. I’m partial to using canned goods and very large washers (like, from airplanes – long story). Lazier cats also work, but mind the tail and the ears.
- Thou shalt apply tension. When removing selvedges, hold the end of the fabric (on both sides of the cut) and pull away from the direction you are cutting.
No, I don’t have strong feelings on the Right Way To Cut, why do you ask? But here’s the thing – cutting doesn’t happen because you are pushing the scissors into the fabric like you can do with wrapping paper. Cutting happens when the blades of the scissors come together and sever the fibers of the fabric.

This is a better problem to have, to be sure, but it’s still going to net you a slightly odd seam and I hope your fabric doesn’t fray and you didn’t oopsie past your stitch line. I’ve seen much more, um, enthusiastic examples than the one shown.
This tends to happen when you’re cutting quickly, but you’ve managed to resist the temptation to lift your scissors and push forward faster than you’re cutting. (It is, technically possible to do this with a rotary cutter. I’ve seen it! And all I can think is, “How do you cut pizza?!? Does it look like Jack the freakin’ Ripper did it?”)
Here’s a trick I learned from my mother, who had approximately zero sympathy for my early cutting woes:
Now, instead of cutting to the end of the scissors and trying to line the next whack-chop cut up, simply slide the scissors forward under the fabric as you re-open them. It’s more of a motion-of-the-ocean thing. You are not chopping logs.
Pro tip: when you get good at this motion, you can actually apply a slight backwards pull on the scissors while cutting. This will keep tension on the fabric. You’re now multitasking with the scissors: closing them cuts the fabric as intended, but the resistance while that’s happening grips the fabric and lets you put in tension with the scissors. This is especially effective with thinner fabrics. You get to a point where you can do it one handed, hanging in the air, demoing all the Wrong Things but getting the Right Result.
That is why cutting cloth looks so ding-dang easy when someone with experience does it. Like, ultimate no brainer, right? Why actually even pays attention? You just gotta get that done because this pattern has a million pieces and there’s only 2 weeks on the syllabus to sew it and it has POCKETS and a ZIPPER which are clearly BLACK MAGIC now that you have to sew them!!!!! Or this is for faire and you want to wear it TOMORROW and you just got the trim in and you still think you’re hand-binding the eyelets tonight so cutting can be so-so, you’ll just sew it better than you cut it and your eyelets will be the talk of the festival!!!!!
Don’t.
Just don’t.
Take the woosah moment.
Let your scissors do their job.
This has been a Public Service Announcement.
Thanks for the tips. I’ve noticed how wonky my cutting gets when I hurry or am tired, but having the mechanics articulated is great!
Thank you! I’m glad it helps. It took me years (and a professional seamstress Mom) to figure out why I was failing with scissors. ;)
“how do you know where your stitching line is?”
That’s the reason I actually line-baste (basting along the stiching line as soon as it’s drawn, before cutting the fabric) f…rankly everything.
That’s a really high end way to handle it. I’ve worked with that technique in couture classes, and it does work much better than just marking the stitching line for sewing. (You can feel the thread to make sure the stitch lines are aligned.) I generally don’t do it, because speed. Oh, and lazy. You are a more devoted cutter than I! :)