
So here’s the thing about sewing: eventually, people will figure out that you do it. And then they will have questions… Uncomfortable questions. Questions like: “Can you fix a…” and “Can you rehem my…”. Sometimes they will make an appeal to emotion: “My grandmother always used to do this for me, but she’s so sick and close to the end now that I just don’t feel comfortable asking her, the dear soul… Can you help me? I just want these pants to be hemmed correctly FOR HER FUINERAL because she would DIE AGAIN OF HORROR if I used iron on hem tape and irons aren’t really my thing anyway thanks.” (With all condolences to anyone reading this who actually has a dying relative who used to handle their domestic errands.) I for real don’t know why people ask me these things, since I legit just cuff up my jeans when they are too long, which is always, because I’m short and somewhere someone decided that jeans labeled “short” should be right for someone 5’8” – 6’1” tall. Seriously. That’s not how that word even works.
So you’re gonna want to know how to actually properly rehem a pant. The good news is that it’s really not that intense. I mean, I’ve seen people make it plenty intense, but don’t recommend those methods. They’re like, work. Yuck. :(

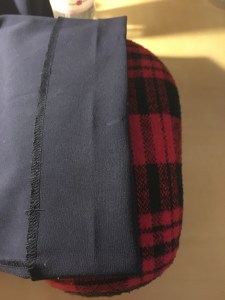
If you look really close, you’ll see a line of tiny divots. Those are the stitches that make up the hem. It’s a machined blindstitched hem, btw. They almost always are, just for hate’s sake. Can you see them well enough to pick them out? This is not a good side of the pant to try to remove this kind of hem from.

If you look really really closely, you might be able to sort out which stitches are the serge, and which are part of the pant hem. I cannot, if i’m being honest. So I’m not going to attack this hem from this side.
Wait, what? If not the outside or the inside of the pant, aren’t we, like, out of sides here? Nope! We’re taking this baby out from the inside of the seam.

If you’re not familiar with machined blind hems, this is how they work*: you do a weird foldy-foldy trick to set up the hem, then the machine sews 4 stitches straight on the hem and zigzags over one stitch to catch the (folded back) main of the pant. You have to set all the widths up for every fabric you do, but once you’re set, it’s blinding fast. (*Unless an actual blind-hemmer machine is being used. Those are super-nifty, and they have a curved needle and the tension can be a trick, but they’re hella cool and no pressing required and the resulting inside stitches look like a serger did them. While drunk. Soooo drunk.)
Anyhoo, going forward…

I don’t have pic for the next step, because it really requires more of a video. Basically, give the two layers a little tug apart and wiggle action after you’ve gotten the first stitch severed. The stitches close to there should surrender.


From there it’s pretty fast and easy.


So, the first part of this operation is done. Now it’s time to mark the new hem and whip that in…

You might be tempted to mark the new hem off the serged edge of the bottom of the pant. Don’t do it! Those things are usually not as straight as you would expect.

If you don’t have a pressing ham, you can roll a towel up really tight and secure it with safety pins. Also, you should as for one on the next gifting occasion. They are way more much cooler than they look.


Inside? Inside the outside? The pant is inside out, so it’s a bit of a grey zone.
So, the pants I’m hemming are a rayon blend. I’m about to iron them. Rayon and irons are a situation. Rayon becomes REALLY SHINE-Y when you hit it with a hot iron. And while that would theoretically be a problem on the inside of the pant, rehemming is a thing and the inside of the pant can become the outside of the pant. Oof. So the right solution is to always use a pressing cloth with rayon.

My steamer, which I much prefer to an iron under basically all circumstances, is in the garage. It’s on the other side of the car. :(

Those of you who know me well enough to have been gobsmacked that I pinned up the hem should sit down for this. Yes, I re-pinned the hem for sewing later. I generally use more pins for hand sewing than machine sewing. I know, right?
So, here’s the thing… Remember earlier when I said that machined blind hem stitches are lightening fast? They are also kind of persnickety, because you have to get the stitch depth right for every fabric and I kind of can’t be bothered. I’ve sewn actual miles of hems by hand. (Because operas, people; because operas.) I’m not terribly troubled by hand hemming two pant legs. If you hate hand sewing, you might find it worth while to get the machine set up to do the blind hem. I’m just going to do a catch stitch (aka, cross stitch or X stitch or maybe other aliases as well), because my needle doesn’t really need setup time.
Here’s how we do:


Wait, what?!? Yeah, that trick for getting a knot on the end of your sewing thread works in the middle of fabric, too. Also, I’m not sure why I do the stitch then stitch-knot action. I truly believe that it stays in better, but I’m not sure I have actual empirical evidence to support that belief. So… Yeah. Anyhoodles…


Sorry for the terrible photography. This was done as part of a Real Life Thing(tm), and navy fabric with navy thread isn’t ideal. I’ll do a high contrast versions at some point. I actually love this stitch – it works up fast and it’s got some really neat strong suits.

Caveat: yes, I do know a fully invisible-from-both-sides way to do up a hem. But if I took the time to hem it and hem it well, you’re gonna know. Thhhrrriiibbbt, and so there. The catch/cross stitch is awesome because there is a bit of play to it. There’s enough thread that layers can swing semi-independently, and you don’t get that stiffness like when a hem has been nailed to the main of the fabric (most problematic on loose, swingy, or curved hems).

Now, to be real, the stitches were completely invisible when I put them in (I do have a witness), but they were lamentably visible (to me, not to my witness) the next day after relaxing folded on a flat surface. So just be aware that hems hate you, and they want to help you fail. Because hems a-holes. Just so as you know….
ps – if anyone ever asks you to hem up jeans, say no. The average home sew machine just won’t like that, and you don’t want to do it by hand. If they beg/plead/whine/cajole, honestly, punching them and hoping for a jury with a stitcher or two on it seems like a reasonable response. ;)
pps – no, but for the reals. Completely reasonable. HAVE YOU EVER HEMMED A JEAN WITHOUT AN INDUSTRIAL MACHINE? Yes? Ok, but have you hemmed a jean with an industrial machine? No? Trust me, you can keep your “jeans-a-ma-jig” thinger. You just need an industrial for that madness.
So…. Least sexy content ever? Prolly. Useful? Hopefully. I’m curious… What’s the weirdest “So, I heard you sew. Can you….” request you’ve ever gotten/heard of?
The weirdest “So, I heard you sew” request I’ve ever gotten was when someone I barely know asked me if I could make the neckhole of a shirt smaller. Make a hole… smaller???
And someone asked me about replacing a zipper once, even though pretty much all I sew is 18th century and I have very little experience with zippers.
Why can’t people just take things to alteration shops? There are several such shops in my town!
(I know, I know, it’s because they want alterations for free.)
OH and I just remembered, someone once tried to dump an unfinished quilting project on me! “You sew, right? Well there’s a whole quilt in here, all cut up and ready to sew!” she said, as she handed me a bag full of triangles of hideous and disgusting polyester fabric, some of which were already sewn together. I understand that unfinished projects happen, but that’s not the proper way to deal with them. Also, I’ve never made a quilt before.
LOL – make the neck hole smaller? I mean, sure, ok, but that shirt is gonna look REAL WEIRD! Omg, that is the awesome of profoundly not awesome. Also, you are a better person than I. My response to the quilt pieces would have been… “direct” is too subtle. I would have directed all of my suppressed road rage at that person. All I need is a jury of my peers, right? We can still find 12 people who sew in my area, surely.
Seriously, thank you for putting the time in to posting that – it was a day today, and I needed that laugh! Stay awesome, Vincent! :)
Yeah, to even attempt that would require taking apart and practically re-making the whole darn shirt!
I can’t remember what my reply to the quilt stuff was, but I know I did end up taking the bag and letting it sit in my room for a while before I inevitably threw it out. (I’m normally very big on saving fabric, but this stuff was… so bad.. so scratchy. So orange and avocado and baby blue and all manner of colours that should not be together.)
But that was years ago when I was a very very shy teen, and I’m certain I’d have the courage to say NO if someone made such an offer today!
Lol! It does take years to learn to say no to helping people with their sewing requests. Kudos for learning that skill! Your time and sanity (and aesthetic sensibilities) are important. :)
Yeah, someone JUST tried, this weekend, to sell me on taking about a hundred Hawaiian shirt kits a friend of his had made and sewing up the shirts to sell them. A) I don’t even like making clothes I wear twice; B) I don’t do production sewing; C) I am not setting up a business to sell only and solely 100 copies of THE SAME SHIRT.
Oh! Good call and very good reasons! I am right there with you on all of them!
Hiya, gorgeous! Best request story: a dear friend from junior high said, “I know you and your Mom can sew. Can you take these heirloom-quality, super-fine crossstitch needlework Christmas stocking kits I’ve been working on for my children for the last two years and sew them into stockings by a week from now?” So there was absoutely no way I could have or would have said no, not even when I realized what we had gotten into…
1) My mother and I sweated BULLETS over cutting out the “I spent hundreds of hours on this for my child” crossstitch design to fit the shape of the stocking lining and back. There was no. Spare. Room. And that MoFo pattern was not even marked on the crossstitch field. We had to freehand it. I mean, it drove us to drink. Afterward. 2) The seam allowance on the finished cutout was about 1/8″! If I had so much as QUIVERED, it would have ruined the whole thing. 3) Similarly, cutting out the red felted wool for the back of the stocking was a matter of PRECISION. Leftover wool amounted to 1/4″ wide by 3″ long scrap…which, after finally letting out our breath, my Mother and I decided to use to make the hangy-loop-thingy for the stocking. There was no wool leftover, not an inch. Whoever designed that kit was a freaking sadist. I love her to death, but when she has grandkids? Yeah, I’m not signing up for that tradition.
LOL! Omg, it is always the sentimental projects that turn out to be the most nerve-wracking! That kit was designed by a sadist! Kudos to you for making it happen. You are an amazing friend – I already knew that, but this is just further proof! :)
When your adult choir of 50 people asks who can sew to help hem up the uniform dresses, you most definitely do not raise your hand. Sorry, but I have three kids and hemming those polyester dresses with a large taper at the bottom of the dress never ends well. Even my own hem looks pretty awful up close.
P.S. I just found your blog and am loving it! I’m no professional, I mostly just sew for my kids (miniature sewing projects are very satisfying). I did win the county fair with my winter coat last summer so I have to step up my game to defend my title. I Iove picking up new hand finishing techniques! Thanks!
Hi, Emily! Lol – if anyone had asked me that, I would have claimed a sudden paralysis from the wrists down! No, ma’am – I feel like those are designed to be the worst alteration ever. Like, they are all sizes for people 6’2”, with that taper, and have to be altered down to 5’4”. Not cool at all.
Kudos to you for finishing the miniature people sewing projects while said people are still the same size! It takes me a year and change to finish something for a 16” doll these days. I need to work on that.