This is a very popular style of bodice amongst the english during the Elizabethan period. It shows a distinctive inverted arch to the neckline. Commercial patterns don’t seenm to ever do this. Not sure why — it’s a pretty fabulous look.
A design sketch, showing seam placement and the rough arch depth.
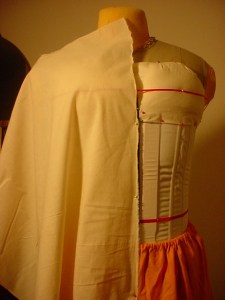
I start the bodies from the front, by pinning the straight edge of the muslin along the center front mark of the dummy.
Next, I smooth the muslin over the dummy, pinning it down as I go along. The muslin is slightly stretched at this point, so the pins are pretty necessary. I’m pinning out the bottom curve of the bodice as I go — otherwise, you get some nasty wrinkles to deal with.
The muslin is smoothed all the way over to the side seam. I’ve also finished the curve at the bottom of the bodice.
I’ve pinned in the outline of the strap and arched neckline. To make sure the neckline is right, I’m using my “modesty” mark (the pink ribbon pinned across the dummy’s chest). I can only stray below that at the absolute corner of the bodice (where the neckline meets the strap), and I want to make and arch that goes to about a half inch above the modesty line in front.
The front piece of the bodies, trimmed along the pin lines.
The front piece, after trimming, from the side so you can see the side seam and the curve around the armscye. I cut the armscye fairly high, because I find you get a better silhouette that way.
Starting the back piece. Again, I start by pinning a straight edge of muslin to the center line in the dummy.
And, again, I’m smoothing the fabric over towards the side seam, pinning it down as I go. I’m also pinning in the back neckline (a shallow scoop) and the waistline as I go.
The back piece, trimmed along the pin lines.
Shown from the side, you can now see the full armscye. Period armscyes tend to be smaller than modern ones, and that’s an odd adjustment to make in your head when you’re making patterns.


I don’t know if you check this, but is there anything special you do to keep the arch nice after sewing? I made a fully lined prom dress for my daughter with this neckline (that I drafted) and it lay really nicely in the cotton mockup. But the end result in stiff satin has the layers separating and puffing out, despite understitching and pressing.
This is probably going to be too late to help you, but there are a couple tricks. Because of its weave, satin (even stiff satin) can be a shifty and oddly stretchy beast, especially on curved or bias cuts. The best way I know to control it is a bridal/couture(ish?) technique. Don’t sandwich all the bodice layers together at the end of construction. Put the lining and all of the infrastructure layers together, then press the seam allowances towards the inside of the garment and hand sew them down to the inner lining. Put the lining on a stand (or target person). Now lay the outer fabric over the infrastructure layers, and pin (or clip!) together at the top edge with the satin rolled to the inside of the garment. Repeat the same thing at the bottom and all other edges. (I am so sorry if you are using a person here – it’s not gonna be fun!) Then you’re going to carefully remove the garment, neatly turn up the outer layer seam allowance inside the garment, and sew it to the lining by hand. It’s not as horrible to do as it sounds.
Other (maybe faster!) options include:
– Before you sandwich the layers together, use a glue stick to glue the outer to the lining as close to the stitch line as possible. This will minimize the amount of shifting and general wonkiness you get from the satin. (Low-end cheat)
– Hand tape (i.e., sew a narrow bit of woven cotton tape) to the satin layer right inside the seam allowance. This will also help prevent stretching. (Nice way to do things)
– Alternately, cut the piece with about a 3″ seam allowance, mark the sew lines for the piece, and machine stitch right inside the cut line. Cut to the correct seam allowances after. This will help keep the edge stabilized. (Actual legit method)
– UNDERSTITCH like your life depends on it. (Also legit)
– Decorative beading hides a lot of sins. (An “I meant to do that!” save)